
Have you ever wondered what people actually do when they enter your WordPress website?
Have you thought about which website pages they tend to stay on longest, what campaigns bring them there, and which of your website pages convert the best?
Google Analytics can help you understand all of this information and more. By simply installing a Google Analytics plugin on your WordPress website, you can start collecting this data immediately. With help from a plugin, adding Google Analytics to WordPress is a painless process.
If you’d rather not install a plugin for this purpose, there are other ways to integrate Google Analytics with your website too — as long as you’re comfortable with code.
In this guide, we’ll walk you through how to install Google Analytics in WordPress with two different methods. In a handful of steps, you can uncover insights about your website visitors — including what is and isn’t working for them — to improve the user experience, increase conversions, and learn about your audience.
Google Analytics for WordPress: What Can You Track?
Whether you’re looking for details about who is visiting your site, what they’re doing while on your site, or how long they’re staying on specific pages, Google Analytics provides you with the report you need. The tool allows you to track many interactions between your website and visitors.
Let’s review some more of the specific types of reporting Google Analytics provides:
Real-time Activity
Realtime reports show you current activity on your website, including where visitors enter your website and the actions they take on your site. You can also see how users are getting to your site, what pages they’re visiting, and whether they’re converting. This report is useful for monitoring the immediate results of a campaign, social media post, or real-world event.
Acquisition
Acquisition reports will help you understand where your visitors are coming from. This information is helpful when setting up your marketing campaigns because it can show you exactly what’s working best for your acquired visitors. It also tells you which users are new and which are returning.
Engagement
Engagement reports help you understand how users are interacting with your website. It includes page views, scrolling activity, time-on-page, interactions with media, and other important events. Google Analytics groups user activity by sessions — a session can be understood as a single visit to your website.
This report also tracks conversion rates. You can compare them to your goal and understand which CTAs are working. You’ll learn more about which CTAs and landing pages on your site are successful and what keeps your visitors most engaged.
Monetization
Monetization reports track your revenue from purchases, subscriptions, and advertisements on your site. It also shows you how users move through the checkout process and how they engage with your product pages.
Retention
Retention reports monitor how well your website retains visitors — in other words, how often users return to your website after their first visit, and for how long. You can also view retention by cohort. A cohort is a group of users that share a characteristic, like the date of their first session.
Demographics
The demographics report will help you understand who your visitors are. It reports users by age, language, location, gender, and topics of interest.
Tech
Tech reports show you the technology that visitors use to access your website, including device category (desktop, mobile, or tablet) and accessing application (web browser or mobile application). This information can help guide your optimization efforts based on which technologies your users prefer.
Analytics Specific to Your Plugin
In addition to the plethora of information that you receive from Google Analytics, your chosen plugin will also provide you with unique insights. For example, let’s review what ExactMetrics provides. Some of these insights and features come standard with other analytics plugins in the WordPress library as well.
In-Depth Performance Reports. These reports provide you with in-depth performance details, such as bounce rates, referrals, page views, organic searches, and more, for each post and page on your website so you can segment your analytical data in a way that makes sense for your website and business.
Real-Time Stats. You’ll be able to review real-time statistics any time you open the plugin. Some of these stats include the current number of visitors on your website, your acquisition channels, and the source of your current traffic.
Custom Dimension Tracking. You can create custom dimensions to get specific data that matters to you and your business. For example, you can create custom dimension tracking about certain events and types of user engagement that are important to you.
Set Permissions Based On User Roles. If you have a large team, or team of people with different qualifications and needs when it comes to your analytics, you can set permissions based on user roles. This way you can ensure only the right people can make changes.
How to Set Up Google Analytics for WordPress
To add Google Analytics to your WordPress site, you can either go with a plugin or opt for a manual approach. We’ll review both methods, starting with the plugin.
But, whichever method you choose, make sure you have an active Google Analytics account. To sign up for Google Analytics, first create a Google account. If you already have a Google account, you’re off to a great start because that's the only way you can use Google Analytics.
Sign in to your Google account, then head to the Google Analytics sign-up page and click Start measuring.

On the Account Setup page, fill in the necessary information. Your Account Name will be the Google Analytics profile name for your website. You can choose whatever name you like, but we recommend using your business name.
Next, check your preferred boxes under Account Data Sharing Settings to control how Google may share your data, then click Next.
Under Property Setup, provide a name for your first Google Analytics property. You can make this your website’s domain name for now. Click Next.
Finally, under About your business, you can provide additional information about your company. This section is optional. To complete setup, click Create.
You’ll now be taken to your analytics dashboard. On this screen, under Choose a platform, click Web (since you’re tracking a website).
You’ll be asked to set up a data stream, which is a source of data from a website or an app. Fill in the required fields and click Create stream. This provides you with a measurement ID, a string of characters you’ll use to send your website tracking data to Google Analytics. If you go with a plugin, you may need to add this information to the plugin, so it’s a good idea to keep this tab open.
Now that your Google Analytics account is ready, let’s learn how to link it to your WordPress site with a plugin.
Set Up Google Analytics With a WordPress Plugin
Depending on the Google Analytics plugin you choose, setup may differ slightly. For the sake of this example, we’re going to review how to set up the ExactMetrics plugin. Whichever plugin option you end up picking for your site, the process will look fairly similar.
First, you’ll need to install and activate ExactMetrics on your site. (Not sure how? See our guide to installing WordPress plugins.) Once that’s done, select the new ExactMetrics option from your WordPress dashboard, then click Launch Setup Wizard.
Click through the setup screens until you’re prompted to sign in to Google and grant the plugin your desired permissions. Then, on the Connect Google Analytics to Your Website screen, choose the view you created previously and click Complete Connection.
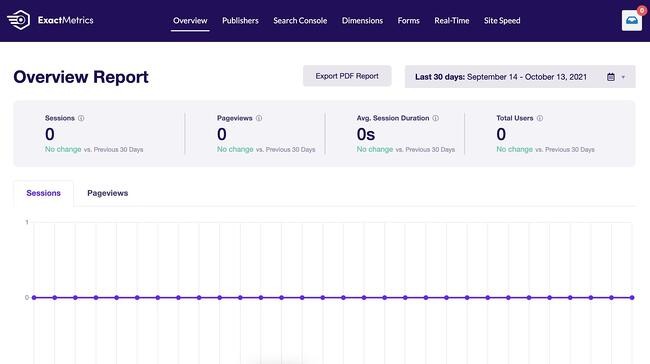
After clicking through some additional screens, you’ll be ready to use Google Analytics with WordPress. View your analytics under ExactMetrics > Reports.
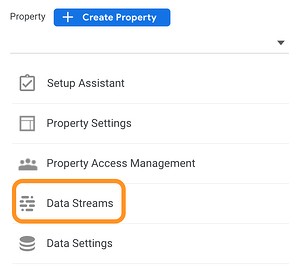
Some plugins may require you to insert the tracking code yourself if they don’t come with the same level of automation. You can find this tracking information by going to your Google Analytics admin tab (the cog icon in the bottom left corner of the dashboard), then choosing Data Streams under the desired account and property.
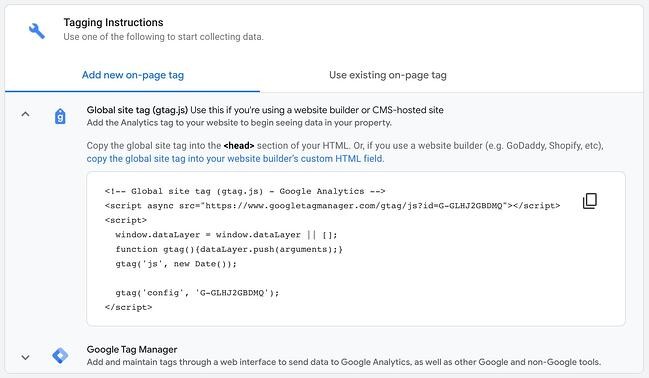
Then, click your data stream. You’ll see your Measurement ID in the top right corner. Further down under Tagging Instruction, you’ll also see your Global Site Tag, a block of code to add analytics to your website in the <head> section of your HTML.
The easiest way to add this script to your HTML is with the Insert Headers and Footers plugin — this lets you add tracking code without directly modifying your files, which could break your site.
Set Up Google Analytics Without a WordPress Plugin
Those who would rather not use a plugin and are comfortable editing WordPress theme files directly can choose this next method instead. Before continuing, back up your WordPress site in case something goes wrong in the process.
Since this method also requires you to change theme files, we also recommend making your edits to a child theme so that you can update the parent theme without losing your modifications.
To get your tracking code, go to your Google Analytics admin tab (the cog icon in the bottom left corner of the dashboard) and choose Data Streams under the desired account and property. Select the data stream you want, then scroll down to Tagging Instruction. Open the Global Site Tag accordion and copy the code.
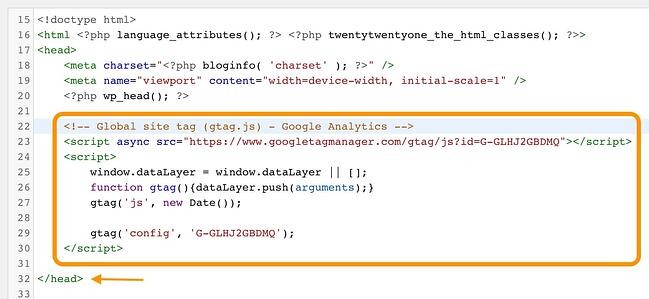
Next, you’ll paste this code into your active theme’s header.php file. Edit this file however you prefer — you can download the file and re-upload it to your server, or edit the file through WordPress under Appearance > Theme Editor.
In header.php, paste your tracking code just above the closing </head> tag (pictured below) and save your changes.
This code will send tracking information from your website to Google Analytics.
Use Google Analytics to understand your WordPress site.
Google Analytics provides you with insights and data that can help you drastically improve the state of your website. You can learn more about what your visitors enjoy and discover more about who they are, so you can continue to tailor your content to their needs.
With WordPress, installing Google Analytics on your website is quick and easy. In just minutes, you can start collecting the information that you need to enhance user experience and increase conversions on your WordPress website.
Editor's note: This post was originally published in November 2018and has been updated for comprehensiveness.