Have you ever registered for a webinar and then totally forgotten about it? Or perhaps you got an email about an upcoming workshop, but you were busy and forgot to put a reminder in your calendar for it? Yep, I'm guessing that's happened even to the most type-A of us.
Well, if you're an email marketer, you've been on the other side of this, when half of the registrants for an event you promoted never showed up. It sucks.
Luckily for you, you don't have to worry about that anymore, because we're about to share a marketing hack with you: how to insert Outlook, Apple Calendar, and Google Calendar invites right into your email in a few easy steps. That way, registrants can add the event directly to their calendars, and then be much less likely to forget about your event.
Get instant access to our free meeting scheduling software. No more wasting time with back and forth emails or setting up calendar invites.
Unless you somehow magically know what type of calendar your target audience uses, your best bet is to include all three major calendar invites in your email, giving recipients a choice that works for them. Outlook and Apple Calendar users will get an .ics file and Google Calendar users will use a URL-based custom invitation.
Note: All screenshots and steps were taken on a Mac, but if you're on a PC, the process is similar.
Step 1: Create a New Event
If you have a Mac, you can create your invitation in Apple Calendar. If you have a PC, you can create it in Outlook. For Google Calendar, you'll create the URL directly from your calendar application (you'll need to be logged into your Google account to do this) -- it doesn't matter which type of computer you have.
Apple Calendar
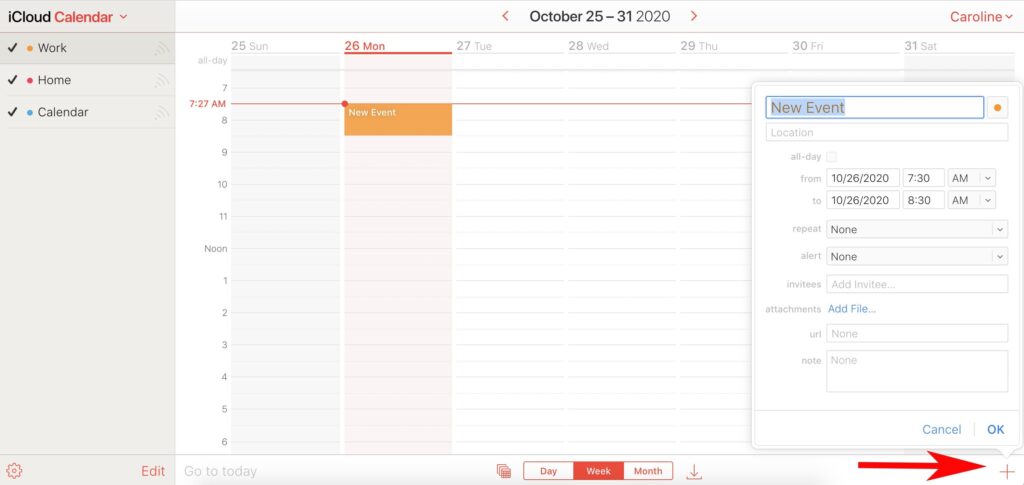
Open Apple Calendar and click on the "+" sign in the bottom right corner of the window. A pop-up will appear. Enter the name of your event in the "New Event" text box and hit return/enter on your keyboard. This will create an event on your calendar, but it will place the event on the current date and time and leave the rest of the details blank. You'll need to change this information to reflect the details of your event (more on that in the next section).

Outlook
Open up Outlook Calendar, then click on the "New Event" icon in the top left corner. An event pop-up will open for editing — simply include the title of the event, time and date, location, and whether or not you want to set a reminder. To find the option to "Invite attendees", click "More options".

Google Calendar
Open Google Calendar in a new browser window. You'll need to be logged into your Google account. Click the "Create" button on the top left side of the screen. A new event window should open.

Step 2: Set Details for Your Event
While Outlook, Apple Calendar, and Google Calendar events have slightly different formats, you'll still need the same components for each one:
- Event name
- Location
- Time
- Event description
- URL of your event's landing page
- Optional event alert
Below are examples of how these details look in the different applications, as well as a clarification of what information and format to use for each of these components.
Apple Calendar

Outlook

Google Calendar

The Details You Need to Include
Event Name
Make sure the name reflects what your actual event name is called on your website and in your other promotions (this is a no-brainer, but we're being thorough here). You may want to also include your company name at the end so registrants can quickly remember who is hosting the event when they stumble on it in their calendar later.
Location
Physical address of the event (one line, such as "123 Business Ave, Springfield, TX") or the landing page URL, in the case of an online event.
Time
Enter the start and end dates and times of the actual event. Adjust the timing of the event to your time zone, as you're the one creating the .ics file. It will automatically change the time to correspond with each person's time zone. For example, if you're creating the event file in Boston for a webinar in San Francisco that starts at 10 a.m. PST, you should enter the start time as 1 p.m. EST.
Alert (Optional)
You can set up alerts so attendees don't forget about the event between when you sent the invite and the time of the event. In Outlook, you can set a time for one reminder to go off (such as one hour before). In Apple Calendar and Google Calendar you can set multiple alerts.
It's important to not overwhelm people with too many alerts, as this creates a negative, intrusive experience. Below is an example of an alert sequence in Apple Calendar that reminds folks about your event but isn't in-your-face:

URL of Event Landing Page
Do you have a specific landing page for your event or webinar? Include its URL, as it acts as a refresher for those who may be fuzzy on the details of what the event is about. Include it in the URL section of an Apple Calendar invite as well as in the body text of your Gmail or Outlook invites if you haven't already included it in the Location section.
Description
Here, you should include a snippet of the event's details. This goes in the "note" section of your Apple Calendar invite, in the body of your Outlook invite, or in the "description" text box in Google Calendar.
It's also helpful to provide your contact info in this section. That way, people can reach out if they have any questions.
Step 3: Save and Send Your Event
Once you're all set editing the invite, you can save it to use as an attachment in your marketing email.
Outlook
Click on your event in Outlook, select "Edit", and then click "More options". Once you see the pop-up (shown below), type the emails of people you'd like to invite into the text bar "Invite attendees". When you're ready, click "Send" in the top left of the screen to send the invite to people in your recipient list.

Apple Calendar
Double click on your Apple event to open it up, and then type emails into the "Invitees" text box. When you're ready, click "OK", and the invite will automatically be sent to the emails you've included in the event details.

Google Calendar
Click on your event in your Google calendar and click "Edit event". Then type emails into the "Add guests" text box to the right of your event details (next to "Rooms"). When you're ready, select "Save". If you've done it correctly, Google Calendar will show you a pop-up confirming you'd like to send the event to guests. Click "Send" to ensure it gets sent to the emails you've included.

Step 4: Insert Invites Into Your Marketing Email
The easiest way to send an event via email for Outlook, Apple, and Gmail is to do it directly from the event invite itself. Each of these email providers give you the opportunity to type emails directly into the event, and include additional text, attachments, etc.
Best of all, the invite you'll receive is clean and offers you the opportunity to accept or deny the invite directly from your email inbox:
 However, there are a few workarounds you can try if you'd prefer to include the event URL in a marketing email.
Gmail Calendar
For Gmail calendar, click "Edit" to open the event in a new window, and then select the "More actions" dropdown. From there, click "Publish event":

In the pop-up screen, you'll see an HTML code or a link to the event. Simply click "Copy" beside the link to copy the link, and then open the email you intend to send and paste the URL.

You'll want to ensure, however, that each email recipient has been included on the event invite list, as well.
Apple Calendar
If you're using Apple Calendar, alternatively, you'll need to get a little more creative. To workaround the option of sending the event to a recipient directly from the event details, simply send the event only to your own email. When you open the invite, you'll see a .ics link attached to the email:
Simply download the .ics attachment, and then drag-and-drop that calendar event into an email to send it to recipients.
Outlook Calendar
Finally, if you're using Outlook, you'll need to open your inbox and select "New Items" > "Meeting":

Click "New Meeting", and finally, select "Reply with Meeting" from within an email itself:

And that's it! You're all set. Use these tips to send marketing events to leads, prospects, and customers alike. Take a look at The Ultimate Guide to Event Marketing to learn more about the types of events you might consider creating to engage and delight potential customers.
Editor's Note: This post was originally published in June 2014 and has been updated for freshness, accuracy, and comprehensiveness.